 --%3E%3Csvg version='1.1' id='Lager_1' xmlns='http://www.w3.org/2000/svg' xmlns:xlink='http://www.w3.org/1999/xlink' x='0px' y='0px' viewBox='0 0 1500 371.7' style='enable-background:new 0 0 1500 371.7%3B' xml:space='preserve'%3E%3Cstyle type='text/css'%3E.st0%7Bfill:%23005EA8%3B%7D%3C/style%3E%3Cg%3E%3Cpath class='st0' d='M237.9 12.6h-89.8v8.9l1.8 0.3c19.6 3 28.5 6.5 32 12.6c1.3 2.2 1.9 4.9 1.9 8.2c0 11.3-7.2 29.4-19 58.8c0 0-28.2 71.2-35.8 90.3c-3.6-9.2-47.8-121.4-47.8-121.4l-1.9-4.7c-3.2-8-6.8-16.7-6.8-24.1c0-3.1 0.6-5.9 2.1-8.4c3.6-6 12.5-9.8 26.3-11.3l1.9-0.2v-9H0v8.9l1.9 0.2c25.4 3 32.5 21.2 41.4 44.2l1 2.6c0 0 70.8 178.5 70.8 178.5h7.2l59.9-150.7l2.8-6.8c17.1-42.2 26.5-65.5 53-67.9l1.9-0.2v-9H237.9z'/%3E%3Cpath class='st0' d='M243.4 87.4l-40.9 14.9v6l1 0.6c18 11 18 14.4 18 27.3v63.2c-0.3 25.2-1 27.6-22.5 31l-1.8 0.3v8.9h76.7v-8.9l-1.8-0.3c-21.6-3.4-22.5-4.5-22.5-31V89.3l-5.5-2.1L243.4 87.4z'/%3E%3Cpath class='st0' d='M216.2 59.3c0 10.4 8.1 18.8 18 18.8c9.9 0 18-8.4 18-18.8c0-10.4-8.1-18.8-18-18.8C224.3 40.5 216.2 49 216.2 59.3'/%3E%3Cpath class='st0' d='M324.9 59.8h-3.7l-45.4 47.4l3.1 4.7h19.8v86.9c0 0 0 5.8 0 6.9c0 13.1 0.5 23.5 7.1 30.1c4.8 4.8 12.3 7.1 23.7 7.1c15.7 0 32.1-3.5 49.9-10.6l1.7-0.7l-2.2-9.2l-2.1 0.6c-5.3 1.5-11.3 2.2-17.8 2.2c-32.1 0-32.1-17.1-32.1-45.4v-68h49.1v-18H327V59.8H324.9z'/%3E%3Cpath class='st0' d='M433.7 87.4l-38.4 14.9v5.8l0.8 0.6c14.4 10.9 14.4 14.4 14.4 27.3v63.3c-0.3 25.2-0.9 27.6-20.9 31l-1.8 0.3v8.8h82v-8.9l-1.9-0.2c-29.2-3.5-29.2-5.6-29.2-31v-33.1l0-1.1c-0.3-17.4 2.2-46.8 22.4-48.8c5.2-0.5 11.7 4.9 16.5 8.8l3 2.4l1.2-0.6c8.4-4.2 17.3-13.1 17.3-22.5c0-10-7.6-17.2-18-17.2c-18.4 0-33.8 17.8-42.1 33.3c0.3-10.5 1-31.3 1-31.3l-5.6-2.1L433.7 87.4z'/%3E%3Cpath class='st0' d='M534.9 163.4c0-31.2 14.1-64.7 45.2-64.7c33.3 0 45.8 42.3 45.8 68.9c0 24.6-11.8 63.7-43.3 63.7C549.7 231.4 534.9 191.6 534.9 163.4 M501.7 165.7c0 45.4 32.3 77.1 78.6 77.1c44.1 0 78.7-34.4 78.7-78.4c0-45.4-32.2-77.1-78.3-77.1C535.7 87.3 501.7 121 501.7 165.7'/%3E%3Cpath class='st0' d='M710.6 0.3l-37.1 15V21l0.9 0.6c14.4 10.9 14.4 14.4 14.4 27.3v150.4c-0.3 25.2-1 27.6-22.5 31l-1.8 0.3v8.9h76.7v-8.9l-1.8-0.3c-21.6-3.4-22.5-4.5-22.5-31V2.1L711.4 0L710.6 0.3z'/%3E%3Cpath class='st0' d='M793.9 87.4L753 102.3v6l1 0.6c18 11 18 14.4 18 27.3v63.2c-0.3 25.2-1 27.6-22.5 31l-1.8 0.3v8.9h76.7v-8.9l-1.8-0.3c-21.6-3.4-22.5-4.5-22.5-31V89.3l-5.5-2.1L793.9 87.4z'/%3E%3Cpath class='st0' d='M766.7 59.3c0 10.4 8.1 18.8 18 18.8c9.9 0 18-8.4 18-18.8c0-10.4-8.1-18.8-18-18.8C774.7 40.5 766.7 49 766.7 59.3'/%3E%3Cpath class='st0' d='M868.3 36.2c-10.5 17.6-12.3 36.1-12.7 53.6c-1.8 1.1-25.3 15.4-25.3 15.4v6.6h25.2v87.6c-0.3 25.2-1 27.6-23.1 31l-1.8 0.3v8.9h82.9v-8.9l-1.9-0.2c-28-3.5-28-5.6-28-31v-87.6h40.4v-18h-40.4V76.3c0-23.1 3.2-61.7 24.9-61.7c14.2 0 27.4 17.4 32.5 24.9l0.6 0.9l1.1 0c6.2 0.2 11.5-1.5 15-4.8c2.9-2.8 4.4-6.5 4.4-11.1c0-17.8-23.4-24.4-38.2-24.4C902.7 0.2 881.9 13.7 868.3 36.2'/%3E%3Cpath class='st0' d='M987.7 98.7c14.1 0 22.2 14 25.3 28c-4.5 0.2-49.3 2.2-54.3 2.4C962.4 114.5 971.9 98.7 987.7 98.7 M925.2 168c0 42.7 29 74.8 67.4 74.8c23.1 0 45.7-15 59.1-39.1l0.9-1.6l-7.9-6.1l-1.3 1.8c-9.7 13.6-20.5 19.7-35 19.7c-14.5 0-27.2-5.5-36.9-16c-10.2-11-15.9-26.2-15.9-42.5c0-1.7 0.1-3.4 0.2-5.1c0 0 0.9-11.4 1.1-14.4h90.5l-0.1-2.2c-1.3-30.5-20.9-50.2-50-50.2C956.2 87.3 925.2 122 925.2 168'/%3E%3Cpath class='st0' d='M1436.4 173.1c0.6-90.8 69.3-98.9 63.2-133.3c-7.7-43.9-149-57.6-253.8-9.8c-36 16.4-67.6 33.7-98.5 57.3c-7.3 5.8-9.5 12.6-10 19.2c0.5 38.6 11.9 74.6 31.1 105.1c6-8.3 12.5-17 18.6-25.1c19.6-25.8 23.2-31.2 57.9-58.8c69.5-55.2 178.1-83.1 186.1-59.1c7.9 23.8-37.2 42.7-37.2 107.2c0 43.2 21.1 73.5 39.6 91.8v0c11 9.9 14.9 6.4 22.3 2.1c0.5-0.3 1-0.5 1.4-0.6c13-9.2 24.9-20 35.4-31.9C1459.4 223.9 1436.2 205 1436.4 173.1'/%3E%3C/g%3E%3Cg%3E%3Cpolygon points='950.2 360.9 937.6 329.4 930.1 329.4 947.5 370.8 952.7 370.8 970.1 329.4 962.7 329.4 '/%3E%3Crect x='980.2' y='329.4' width='6.6' height='41.5'/%3E%3Cpolygon points='994.8 335.2 1006.1 335.2 1006.1 370.8 1012.7 370.8 1012.7 335.2 1024 335.2 1024 329.4 994.8 329.4 '/%3E%3Cpath d='M1056.4 351.5c1.5-1.1 2.6-2.5 3.4-4.2c0.8-1.7 1.2-3.6 1.2-5.7c0-2.5-0.6-4.7-1.7-6.6c-1.1-1.8-2.7-3.2-4.8-4.2c-2-1-4.5-1.5-7.2-1.5h-12.9v41.5h6.6v-16.3h2.9l12.4 16.3h8.3l-13.6-17C1053.1 353.4 1054.9 352.6 1056.4 351.5z M1045.4 349h-4.4v-14.4h4.4c2.8 0 4.9 0.6 6.5 1.9c1.5 1.3 2.3 3 2.3 5.3c0 1.5-0.4 2.8-1.1 3.9c-0.7 1.1-1.7 1.9-3 2.5C1048.8 348.7 1047.2 349 1045.4 349z'/%3E%3Cpath d='M1107 334.9c-1.9-2-4.1-3.5-6.7-4.6c-2.5-1.1-5.2-1.7-8.1-1.7c-2.9 0-5.6 0.6-8.1 1.7c-2.5 1.1-4.7 2.6-6.7 4.6c-1.9 2-3.4 4.3-4.5 6.9c-1.1 2.6-1.6 5.4-1.6 8.4c0 3 0.5 5.8 1.6 8.4c1.1 2.6 2.6 4.9 4.5 6.9c1.9 2 4.1 3.5 6.7 4.6c2.5 1.1 5.2 1.7 8.1 1.7c2.9 0 5.6-0.6 8.1-1.7c2.5-1.1 4.8-2.6 6.7-4.6c1.9-2 3.4-4.3 4.5-6.9c1.1-2.6 1.6-5.4 1.6-8.4c0-3-0.5-5.8-1.6-8.4C1110.4 339.1 1108.9 336.9 1107 334.9z M1105 356.2c-0.7 1.9-1.7 3.5-2.9 4.8c-1.2 1.4-2.7 2.4-4.4 3.2c-1.7 0.8-3.5 1.1-5.5 1.1c-2 0-3.8-0.4-5.5-1.1s-3.1-1.8-4.4-3.2c-1.2-1.4-2.2-3-2.9-4.8c-0.7-1.9-1-3.9-1-6c0-2.2 0.3-4.2 1-6c0.7-1.8 1.7-3.4 2.9-4.8s2.7-2.4 4.4-3.2c1.7-0.8 3.5-1.1 5.5-1.1c2 0 3.8 0.4 5.5 1.1c1.7 0.8 3.2 1.8 4.4 3.2c1.2 1.4 2.2 3 2.9 4.8c0.7 1.8 1 3.9 1 6C1106 352.3 1105.6 354.3 1105 356.2z'/%3E%3Cpolygon points='1131.7 329.4 1125.1 329.4 1125.1 370.8 1147.5 370.8 1147.5 365.1 1131.7 365.1 '/%3E%3Crect x='1158' y='329.4' width='6.6' height='41.5'/%3E%3Cpolygon points='1179.4 370.8 1186 370.8 1186 353 1200.8 353 1200.8 347.2 1186 347.2 1186 335.2 1201.9 335.2 1201.9 329.4 1179.4 329.4 '/%3E%3Cpolygon points='1213.6 370.8 1235.9 370.8 1235.9 365.1 1220.2 365.1 1220.2 353 1235.3 353 1235.3 347.2 1220.2 347.2 1220.2 335.2 1235.9 335.2 1235.9 329.4 1213.6 329.4 '/%3E%3Cpath d='M1282.6 354.2h12.5v0.9c0 1.6-0.3 3-1 4.3c-0.7 1.3-1.6 2.4-2.7 3.3c-1.1 0.9-2.4 1.7-3.9 2.2c-1.4 0.5-2.9 0.8-4.5 0.8c-1.9 0-3.7-0.4-5.3-1.2c-1.6-0.8-3.1-1.9-4.3-3.3c-1.2-1.4-2.2-3.1-2.9-5c-0.7-1.9-1-4-1-6.3c0-2.1 0.3-4.1 0.9-6c0.6-1.9 1.5-3.5 2.7-4.9c1.2-1.4 2.6-2.5 4.3-3.3c1.7-0.8 3.7-1.2 5.9-1.2c2.3 0 4.5 0.4 6.7 1.3c2.2 0.9 4 2 5.5 3.6l3.2-5.1c-1.3-1.2-2.8-2.2-4.5-3.1c-1.7-0.8-3.4-1.5-5.3-1.9c-1.9-0.4-3.8-0.7-5.7-0.7c-3.2 0-6.1 0.6-8.7 1.7c-2.6 1.2-4.8 2.7-6.6 4.7c-1.8 2-3.2 4.3-4.2 6.9c-1 2.6-1.4 5.3-1.4 8.2c0 3.1 0.5 5.9 1.6 8.5c1 2.6 2.5 4.9 4.3 6.9c1.9 2 4 3.5 6.5 4.6c2.5 1.1 5.1 1.6 8 1.6c2.4 0 4.7-0.4 7-1.2c2.3-0.8 4.3-1.9 6.1-3.4c1.8-1.5 3.3-3.3 4.3-5.5c1.1-2.1 1.6-4.5 1.6-7.2V349h-19.2V354.2z'/%3E%3Cpath d='M1335.6 351.5c1.5-1.1 2.6-2.5 3.4-4.2c0.8-1.7 1.2-3.6 1.2-5.7c0-2.5-0.6-4.7-1.7-6.6c-1.1-1.8-2.7-3.2-4.8-4.2c-2-1-4.5-1.5-7.2-1.5h-12.9v41.5h6.6v-16.3h2.9l12.4 16.3h8.3l-13.6-17C1332.3 353.4 1334.1 352.6 1335.6 351.5z M1324.6 349h-4.4v-14.4h4.4c2.8 0 4.9 0.6 6.5 1.9c1.5 1.3 2.3 3 2.3 5.3c0 1.5-0.4 2.8-1.1 3.9c-0.7 1.1-1.7 1.9-3 2.5C1328 348.7 1326.4 349 1324.6 349z'/%3E%3Cpath d='M1386.2 334.9c-1.9-2-4.1-3.5-6.7-4.6c-2.5-1.1-5.2-1.7-8.1-1.7c-2.9 0-5.6 0.6-8.1 1.7c-2.5 1.1-4.7 2.6-6.7 4.6c-1.9 2-3.4 4.3-4.5 6.9c-1.1 2.6-1.6 5.4-1.6 8.4c0 3 0.5 5.8 1.6 8.4c1.1 2.6 2.6 4.9 4.5 6.9c1.9 2 4.1 3.5 6.7 4.6c2.5 1.1 5.2 1.7 8.1 1.7c2.9 0 5.6-0.6 8.1-1.7c2.5-1.1 4.8-2.6 6.7-4.6c1.9-2 3.4-4.3 4.5-6.9c1.1-2.6 1.6-5.4 1.6-8.4c0-3-0.5-5.8-1.6-8.4C1389.6 339.1 1388.1 336.9 1386.2 334.9z M1384.2 356.2c-0.7 1.9-1.7 3.5-2.9 4.8c-1.2 1.4-2.7 2.4-4.4 3.2s-3.5 1.1-5.5 1.1c-2 0-3.8-0.4-5.5-1.1s-3.1-1.8-4.4-3.2c-1.2-1.4-2.2-3-2.9-4.8c-0.7-1.9-1-3.9-1-6c0-2.2 0.3-4.2 1-6c0.7-1.8 1.7-3.4 2.9-4.8c1.2-1.4 2.7-2.4 4.4-3.2c1.7-0.8 3.5-1.1 5.5-1.1c2 0 3.8 0.4 5.5 1.1c1.7 0.8 3.2 1.8 4.4 3.2c1.2 1.4 2.2 3 2.9 4.8c0.7 1.8 1 3.9 1 6C1385.2 352.3 1384.9 354.3 1384.2 356.2z'/%3E%3Cpath d='M1427.6 354.3c0 3.8-0.7 6.6-2.1 8.3c-1.4 1.7-3.6 2.6-6.6 2.6c-3 0-5.2-0.9-6.6-2.6c-1.4-1.7-2.1-4.5-2.1-8.3v-24.9h-6.6v26.7c0 5.1 1.3 9 3.9 11.6c2.6 2.6 6.4 3.9 11.4 3.9c5.1 0 8.9-1.3 11.4-3.9c2.6-2.6 3.8-6.5 3.8-11.6v-26.7h-6.6V354.3z'/%3E%3Cpath d='M1468.5 330.8c-2.1-0.9-4.4-1.4-7.1-1.4h-12.9v41.5h6.6v-16.5h6.3c2.7 0 5.1-0.5 7.1-1.5c2.1-1 3.7-2.5 4.8-4.4c1.2-1.9 1.7-4.2 1.7-6.8c0-2.7-0.6-4.9-1.7-6.7C1472.1 333.1 1470.5 331.7 1468.5 330.8z M1467 345.8c-0.8 1.1-1.8 1.9-3.1 2.4c-1.3 0.5-2.8 0.8-4.5 0.8h-4.4v-14.4h4.4c1.7 0 3.1 0.3 4.5 0.8c1.3 0.5 2.4 1.3 3.1 2.4c0.8 1.1 1.2 2.4 1.2 4C1468.2 343.4 1467.8 344.8 1467 345.8z'/%3E%3Cpolygon points='1492.3 329.4 1490.8 329.4 1489 334.3 1487.1 329.4 1485.7 329.4 1484.9 336.9 1486.3 336.9 1486.8 331.8 1488.6 336.7 1489.4 336.7 1491.2 331.8 1491.7 336.9 1493 336.9 '/%3E%3Cpolygon points='1479.5 330.6 1481.4 330.6 1481.4 336.9 1482.8 336.9 1482.8 330.6 1484.7 330.6 1484.7 329.4 1479.5 329.4 '/%3E%3Cpath d='M664.5 370.9v-41.6h10.8c2.7 0 5.1 0.5 7.1 1.4c2 0.9 3.5 2.3 4.6 4c1.1 1.7 1.6 3.8 1.6 6.3c0 2.4-0.5 4.6-1.6 6.4c-1.1 1.8-2.6 3.3-4.6 4.3c-2 1-4.3 1.5-7.1 1.5h-7v17.6H664.5z M668.3 350.1h6c2.1 0 3.9-0.4 5.4-1.1c1.5-0.7 2.7-1.8 3.6-3.1c0.8-1.3 1.3-2.9 1.3-4.7c0-1.8-0.4-3.4-1.3-4.7c-0.8-1.3-2-2.3-3.6-3c-1.5-0.7-3.3-1-5.4-1h-6V350.1z'/%3E%3Cpath d='M694.4 370.9l16.4-41.6h3.6l16.3 41.6h-4.1l-5.1-13.2h-17.9l-5.1 13.2H694.4z M705 354.3h15.3l-7.6-19.9L705 354.3z'/%3E%3Cpath d='M743 370.9v-41.6h10.8c2.7 0 5.1 0.5 7.1 1.4c2 0.9 3.5 2.3 4.6 4c1.1 1.8 1.6 3.9 1.6 6.3c0 2.2-0.5 4.2-1.4 5.9c-0.9 1.7-2.2 3.1-3.9 4.1c-1.7 1-3.7 1.7-6 1.9l13.8 17.9h-4.9l-13.2-17.5h-4.7v17.5H743z M746.8 350.1h6c2.1 0 3.9-0.4 5.5-1.1c1.5-0.7 2.7-1.8 3.5-3.1c0.8-1.3 1.2-2.9 1.2-4.7c0-2.7-0.9-4.9-2.7-6.4c-1.8-1.5-4.3-2.3-7.5-2.3h-6V350.1z'/%3E%3Cpath d='M787.7 370.9v-38.1H775v-3.5h29.2v3.5h-12.7v38.1H787.7z'/%3E%3Cpath d='M850.7 371.7c-2.9 0-5.6-0.6-8.2-1.7c-2.5-1.1-4.8-2.6-6.7-4.6c-1.9-2-3.4-4.3-4.5-6.9c-1.1-2.6-1.6-5.4-1.6-8.4c0-3 0.5-5.8 1.6-8.4c1.1-2.6 2.6-4.9 4.5-6.9c1.9-2 4.1-3.5 6.7-4.6c2.5-1.1 5.3-1.7 8.2-1.7c2.9 0 5.6 0.6 8.2 1.7c2.5 1.1 4.8 2.6 6.7 4.6c1.9 2 3.4 4.3 4.5 6.9c1.1 2.6 1.6 5.4 1.6 8.4c0 3-0.5 5.8-1.6 8.4c-1.1 2.6-2.6 4.9-4.5 6.9c-1.9 2-4.1 3.5-6.7 4.6C856.3 371.2 853.6 371.7 850.7 371.7z M850.7 368c2.4 0 4.6-0.5 6.6-1.4c2-0.9 3.8-2.2 5.4-3.8c1.5-1.6 2.7-3.5 3.6-5.7c0.9-2.2 1.3-4.5 1.3-7s-0.4-4.8-1.3-7c-0.9-2.2-2.1-4.1-3.6-5.7c-1.5-1.6-3.3-2.9-5.4-3.8c-2-0.9-4.2-1.4-6.6-1.4s-4.6 0.5-6.6 1.4c-2 0.9-3.8 2.2-5.4 3.8c-1.5 1.6-2.7 3.5-3.6 5.7c-0.9 2.2-1.3 4.5-1.3 7s0.4 4.8 1.3 7c0.9 2.2 2.1 4.1 3.6 5.7c1.5 1.6 3.3 2.9 5.4 3.8C846.1 367.6 848.3 368 850.7 368z'/%3E%3Cpolygon points='906.4 332.7 906.4 329.4 885.4 329.4 885.4 370.9 889.2 370.9 889.2 351.8 905.3 351.8 905.3 348.4 889.2 348.4 889.2 332.7 '/%3E%3C/g%3E%3C/svg%3E)
Having a laser system can help address a variety of cases in ART while optimising the workflow. It is, therefore, common today for embryology laboratories to have a laser system attached to the microscope at the ICSI workplace.
You are probably already familiar with the use of lasers for assisted hatching or embryo biopsy, since these are the most widely spread applications. There are, however, other ways in which you and your patients can benefit from the use of a laser system in the lab.
Here are 4 ways to use your laser in the IVF lab:
-
Assisted Hatching:
This was the first application and main reason why laser systems were originally developed for IVF. It consists of opening the zona pellucida in order to help the embryo during its hatching process. There are basically 2 different approaches for laser assisted hatching, commonly referred to as “zona drilling” and “zona thinning”.
- Zona drilling: A slit is opened through the zona pellucida by applying one or two laser pulses.
- Zona thinning: A series of multiple pulses are applied along a portion of the zona pellucida to reduce its thickness.
Assisted hatching is used frequently in cases of implantation failure, advanced maternal age, poor endometrial receptivity, hardening of the zona (e.g. cryopreserved embryos).
-
Embryo Biopsy:
Whenever preimplantation genetic testing of the embryo is indicated, a few cells must be removed from the embryo for subsequent analysis. This has been done by extracting a blastomere at day 3 or by extracting the polar body. Nowadays, this is preferably done by trophectoderm biopsy, a technique in which trophectoderm cells will be removed and analysed, so that the inner cell mass, and thus future fetus, can be left intact.
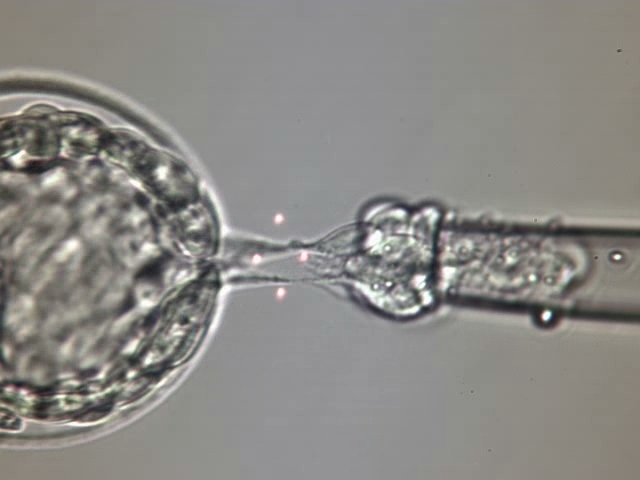
- Trophectoderm biopsy: a few cells are removed from the herniating trophectoderm by cutting the cell junctions with 1,2 or 3 laser pulses, after applying some tension and exposing the them (i.e. “pulling” approach). Or some junctions are first debilitated by the laser pulses and followed by a systematic movement of the pipettes (“flicking” approach). These two laser-assisted approaches will allow for a fast, safe, precise and efficient biopsy on all types of blastocysts.
Common indications for embryo biopsy are increased maternal age, repetitive implantation failure, recurrent pregnancy loss, hereditary disease, idiopathic infertility.
Learn how to perform trophectoderm biopsy with Octax lasers in this technote.
Here you can see how I perform an embryo biopsy using the flicking technique:
And here is an example of how to perform embryo biopsy using the pulling technique:
-
Blastocyst Collapsing:
The laser is also commonly used for collapsing the embryo prior to vitrification, as it has been found to yield better survival rates after warming. This is done by applying a laser pulse on a well expanded blastocyst between 2 trophectoderm cells towards the zona pellucida. Once the embryo has collapsed, it can be vitrified. This collapsing procedure allows the cryoprotectants to better penetrate the blastocyst and, therefore, leads to a more effective vitrification/warming.
Learn how to perform blastocyst collapsing with Octax lasers in this technote.
-
Sperm Viability Testing:
This is often a less known laser application, yet quite useful, especially if you are dealing with cases of severe male factor such as severe asthenozoospermia or when doing ICSI with sperm extracted from the testis as these have not yet acquired their motility ability. Whenever you need to choose between immotile sperm prior to injection, using the laser will help you to identify if a sperm is viable or not. Simply apply a single laser pulse on the tip of the flagellum and wait to see whether there is a membrane reaction. If the sperm reacts, which is evident by a curling of the tail, it means that it is viable. And if there is no reaction, it is not and should not be used.
Learn how to perform sperm viability testing with Octax lasers in this technote.
Why use a laser?
There are other approaches to the above-mentioned procedures. For example, an embryo biopsy can be done mechanically, chemically. These, however, may be too cumbersome, invasive or inconsistent approaches. Using a laser has become a reliable way to work in a safe and consistent manner, thus optimising your workflow and the results for your patients.
Which laser options are available?
In general, there are 2 types of laser systems, static lasers and dynamic lasers. This has a historical reason as originally the lasers were static, meaning that the laser has a fixed position and thus the embryo must be moved to the target, which is not a big deal when one pulse is needed. However, whenever multiple pulses are required, it can be quite time-consuming and impractical to have a fixed laser. Eventually, it became necessary to have more flexibility and dynamic lasers were developed giving embryologists improved control and workflow.
Octax LaserShot (static) and Octax NaviLase (dynamic)
Octax laser systems are considered the pioneers for use in IVF, being the first available since the 90s and with a solid foundation of extensive research leading up to the development. Therefore, we count on a highly robust reliable system of proven safety.
Our static version is known as LaserShot, it is a robust calibration-free system with superior image quality. It can be upgraded to a dynamic one.
Our dynamic version is known as NaviLase, it is our most advanced option available and a popular one today among users because given its dynamic features, flexibility and ease of use, additional to all the same advantages of a LaserShot.
When you work with NaviLase, you have different working modes depending on your specific application.
Working modes:
- Hole: Single pulse. Can be used for assisted hatching, embryo collapsing and sperm viability testing.
- Hatching: Multiple pulses along a straight line. For assisted hatching (zona drilling)
- Thinning: Multiple pulses along a curved line. For assisted hatching (zona thinning)
- TE mode: 1, 2 or 3 specially designed for trophectoderm biopsy
Safe since the start
Octax lasers have a long history in IVF. Pioneering and extensive research in the mid-1990s resulted in the 1.48 μm Octax laser becoming the worldwide standard for all lasers used in IVF. A multitude of pre-clinical and clinical studies have proven the safety of Octax lasers. With tens of thousands of children born after laser treatment and with no adverse effects, you can be sure your gametes and embryos are safe during laser procedures performed using Octax lasers. Find a list of publications using Octax lasers here.
Would you like to know more?
Download a short visual guide of Octax laser and imaging systems below.

Please note that Octax lasers are not available in all markets due to local limitations. Not available in the US. Intended use may vary in different markets.
Topics: embryo biopsy